
  |
产品名称:BGA Rework StationT-890产品编号:BGA Rework StationT-890 产品型号:BGA Rework StationT-890 出品单位:ETOOL 浏览次数: 更多产品图片: 
|
||||||||||||||||||||
产品详细介绍: |
|||||||||||||||||||||
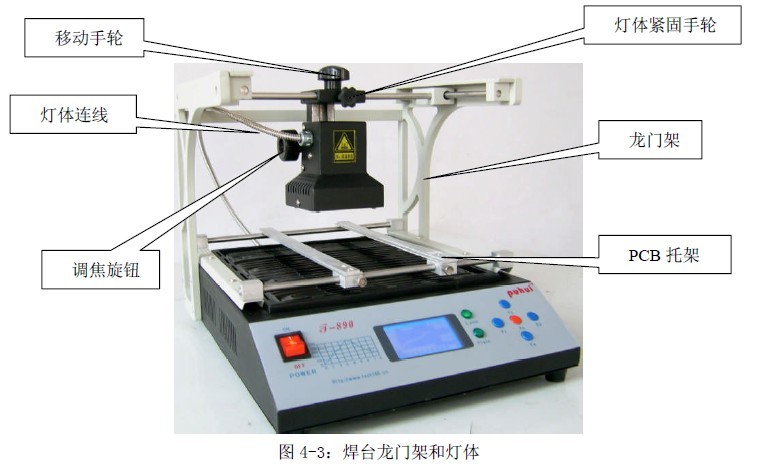
BGA Rework StationT-890
Features
1. This machine has the strong and perfect function selection, with eight temperature waves in the memory software, you can select the right temperature wave according to the solder/unsolder request.
2. Intelligent temperature wave heating, can achieve the solder/unsolder automatically.
3. Three-dimensional adjustable lamp body, use laser light, suitable for unsoldering any-angle components.
4. PID intelligent temperature control can avoid the IC damage due to the fast or uninterrupted warming up.
5. This machine has a super hot melt system, use infrared welding technology which is developed independently, heat is easy to pierce and distribute evenly, can suit for a variety of computer, notebook, play station’s BGA components, especially suits to the computer north and south bridge. 6. Friendly human-machine operation interface, perfect LCD display, you can watch the whole repairing process very clearly.
7. Ergonomic design, practical and easily operated. Good build quality but at the same time light weight and a small footprint allows the T-890 to be easily bench positioned, transported or stored.
Technical parameters
Operating Instructions
1. Examination and operation,
1). Place this machine on an even surface with good ventilation and no combustible items nearby. Leave at least 20mm on either side because the machine will emit heat when in use. Check the power supply voltage, connect the machine with the power supply, assemble the temp-sensor and infrared lamp, turn on the power switch, the LCD screen will display as follows:
Main menu page
2) Press “F1” button, the preheating chassis starts to work, press “F1” button again to stop.
3) Press “F2” button, the infrared lamp starts to work, press “F2” button again to stop.
2. The wave selection and setting 1). Press “F3” button enters to the select/set page, firstly, set the preheating chassis preheat temperature (e.g. set the preheating temperature 113 degree), press “F3/F4” buttons up and down to select different temperature, press “F1” button to save. When hear the tick- tock, it is saved successfully.
2). Press “F2” button enters to the select/set wave page. 3). Press “F2” button enters to the select/set page, following we provide eight different wave cycles, please choose one according to your request, press “F1” to confirm the wave you choose, press “F3” button, come to the Main Menu page.
4). Press “F2” button, the lamp starts heating up according to the setting temperature.
5). When the process finished, return the previous page automatic. If you want to stop in the process, press “F2” button.
3. The wave selection and setting 1). Press “F3” button enters to the select/set page, firstly, set the preheating chassis preheat temperature (e.g. set the preheating temperature 113 degree), press “F3/F4” buttons up and down to select different temperature, press “F1” button to save.
2). Press “F2” button enters to the select/set page.
3). Press “F2” button enters to the select/set page, following we provide eight different wave cycles, please choose one according to your request.
4). If you want to reset the wave, press “F4” to select the point you want to reset, press “F5” button, when it flicker the grid, you can set. Press “F3/F4” buttons up and down to select different temperature, press “F1/F2” buttons forward and backward to select different time, press “F5” button to save.(the grid disappear, change to the previous flicker status), press “F4” button come to next segment, the same method to set the wave, press “F1” button to save the current wave, press “F3” back to the main operation page, the wave setting completed.
5). Press “F2” button, the lamp starts heating up according to the setting temperature.
4. Each temperature wave purposes as follows: Wave one: use the same with soldering the less lead paste, like 85Sn/15Pb 70Sn/30Pb
Wave two: use the same with unsoldering the less lead paste, like 85Sn/15Pb 70Sn/30Pb
Wave three: use the same with soldering the more lead paste, like 63Sn/37Pb 60Sn/40Pb.
Wave four: use the same with unsoldering the more lead paste, like 63Sn/37Pb 60Sn/40Pb.
Wave five: use the same with soldering high-melting-point lead-free paste, like Sn/Ag3.5;Sn/Cu.75 Sn/Ag4.0/Cu.5 Sn95.5/Ag3.8/Cu0.7
Wave six: use the same with unsoldering high-melting-point lead-free paste, like Sn/Ag3.5;Sn/Cu.75 Sn/Ag4.0/Cu.5 Sn95.5/Ag3.8/Cu0.7
Wave seven: use the same with soldering lead-free solder in melting point, like Sn/Ag2.5/Cu.8/Sb.5;Sn/Bi3.0/Ag3.0
Wave eight: use the same with unsoldering lead-free solder in melting point, like Sn/Ag2.5/Cu.8/Sb.5;Sn/Bi3.0/Ag3.0 |
|||||||||||||||||||||
 |
 |
 |
 |